Grilled corn looks simple, yet it can go wrong fast. You’ve probably had ears that turned dry, patchy, or weirdly chewy while everyone politely kept eating. The good news is that a few small dehcisions change everything. If you’re cooking for a backyard dinner, a quick family meal, or a weekend barbecue, you can get sweet, juicy corn with better texture and less stress. You just need the right prep, timing, and a little patience near the heat.
Pick Better Corn Before You Even Light the Grill
Great grilled corn starts at the store or market, not over the flames. If you grab old corn, even perfect grilling technique can only do so much. Look for husks that feel green and slightly damp, not dry and papery. The silk at the top should look light brown and a bit sticky, not black and shriveled.
Give the ear a gentle squeeze. You want full kernels underneath with no soft gaps. If it feels skinny or uneven, move on. Fresh corn also has a mild, sweet smell. Sour or stale notes are a red flag.
If you can, buy corn the same day you plan to cook it. Sweet corn loses sugar over time, and that bright flavor fades faster than most people expect. Corn may act low-maintenance, but it has standards.
Decide Whether You’re Grilling With the Husk On or Off
You’ve got two main paths, and each gives you a different result. Husk-off corn cooks faster and gets more direct char. That smoky, blistered look is great if you want bold flavor and visible grill marks. The tradeoff is moisture loss. Leave it on too long, and the kernels start heading toward sadness.
Husk-on corn steams inside its own wrapper, so the kernels stay more tender and juicy. You won’t get the same deep char on every kernel, but you will get a softer texture and a little insulation from the heat.
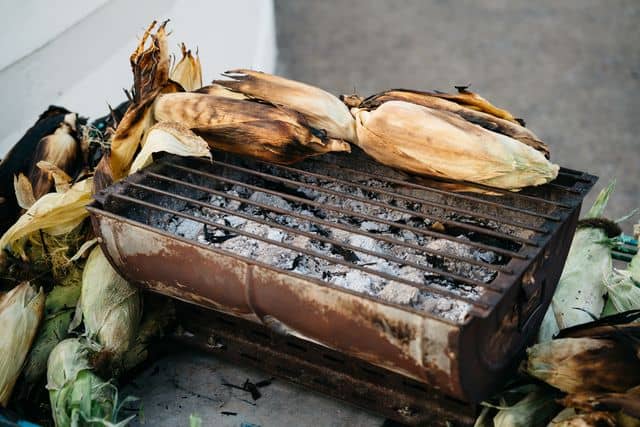
If you want to learn how to grill corn in the husk, start by placing the ears directly on a preheated grill with the husks intact. Turn them periodically so the corn cooks evenly on all sides. The outer husks will darken and char as the kernels inside become tender.
Once cooked, let the corn cool briefly before carefully peeling back the hot husks and removing the silk. You can serve it simply with butter and salt or add seasonings, herbs, cheese, or a squeeze of lime for extra flavor.
Soak or Don’t Soak? Here’s the Honest Answer
You’ve probably heard that soaking corn in water is mandatory. It isn’t. Plenty of cooks soak husked corn for 10 to 30 minutes before grilling because the extra moisture can help the husk resist scorching and create more steam inside. That can work well, especially on a hot grill.
Still, soaking isn’t magic. It won’t rescue old corn, and it won’t replace careful timing. Some people skip it entirely and get excellent results by grilling over medium heat and turning regularly.
If you’re new to grilling corn, soaking is a helpful insurance policy. If you’re comfortable managing temperature, it becomes optional. The bigger issue is avoiding high, aggressive heat that burns the husk before the inside is done. A blackened exterior may look dramatic, but burned doesn’t equal better.
Set Up Your Grill for Control, Not Chaos
Corn cooks best when your grill isn’t acting like a volcano. Aim for medium heat, roughly 375 to 450 degrees Fahrenheit. On a gas grill, that usually means preheating with the lid closed, then lowering the burners slightly before the corn goes on. On charcoal, bank the coals so you have a hotter side and a cooler side.
That two-zone setup gives you options. If the husks start charring too quickly, move the corn to gentler heat. If the ears need a little extra color at the end, slide them over the hotter side for a minute or two.
Clean grates matter more than people think. Even with the husk on, leftover debris and old grease can add bitter flavor. Also keep tongs nearby. Corn rolls, shifts, and occasionally tries to escape. It’s basically the comedian of the grill.
Time and Technique Make the Difference
Once the corn hits the grill, turn it every few minutes so it cooks evenly. For husk-on corn over medium heat, expect about 15 to 20 minutes total. The husk will darken and char in spots, and that’s normal. You’re looking for flexibility in the ear and a steamed feel inside, not total incineration outside.
If you grill with the husk removed, cooking may take closer to 10 to 15 minutes. Turn often so the kernels don’t dry out on one side.
Don’t rely only on the clock. Pull back part of the husk on one ear and check the kernels. They should look bright, plump, and tender. If they appear dull or tough, give them a few more minutes. Corn should taste juicy and sweet, not like it survived something.
Season Smart After Grilling for the Best Flavor
You can season corn before grilling, but post-grill seasoning often works better. Butter melts more evenly on hot kernels, salt sticks better, and delicate ingredients like herbs stay fresher. Start simple with butter, flaky salt, and black pepper. That combination still earns repeat appearances for a reason.
From there, you’ve got options:
– Lime juice and chili powder for a bright, sharp finish
– Parmesan and parsley for a savory, slightly nutty edge
– Smoked paprika and garlic butter for deeper barbecue flavor
– Mayo, cotija, and tajín if you want a street-corn-inspired version
If you’re feeding a group, set out toppings buffet-style. People love customizing their corn, and it saves you from guessing who wants heat and who treats pepper like a personal attack.
Watch for the Small Mistakes That Ruin Good Corn
Most corn disasters come from a few repeat errors. Overcooking is the biggest one. Corn doesn’t need endless time on the grill. Once the kernels are tender, take it off. Keeping it there “just a little longer” is often where things unravel.
Another common issue is uneven heat. If one side of your grill runs hotter, rotate the ears around the grate, not just in place. That small move improves consistency.
Avoid salting too early if the corn is bare. Salt can draw moisture out over time, especially if it sits before serving. Also, don’t peel all the husks off immediately after grilling unless you enjoy fingertip lava. Let the ears rest for a couple of minutes first.
Good grilled corn feels simple when it’s done right. The trick is giving it enough attention to stay juicy without turning dinner into a kitchen science project.
Make Grilled Corn Fit the Rest of Your Meal
Corn is flexible, which makes it useful when your menu feels a little crowded. It pairs well with grilled chicken, burgers, sausages, fish, and vegetable skewers. If your main dish is heavily seasoned, keep the corn simple. If the protein is basic, let the corn carry more flavor.
You can also cut the kernels off and use them in practical ways the next day:
– Toss them into pasta salad
– Add them to tacos or burrito bowls
– Stir them into chowder
– Mix with black beans, red onion, and lime for a quick side
That leftover potential matters if you’re cooking for a family and trying to stretch ingredients across more than one meal. Corn on the cob gets the spotlight, but off the cob, it keeps working. Not many side dishes pull a second shift that well.
Keep It Simple, and You’ll Get Better Results
The best grilled corn usually comes from restraint, not overcomplication. Start with fresh ears, use medium heat, turn them regularly, and choose the husk method that matches the texture you want. Add seasoning after grilling so the flavor stays bright and the kernels stay juicy.
You don’t need expensive gear or chef-level instincts. You need decent corn, a stable grill, and enough attention to pull it at the right moment. Once you get the rhythm down, grilled corn becomes one of those dishes you can rely on. It looks impressive, tastes like summer, and rarely leaves leftovers unless you planned for them.