Picking your first diamond painting kit feels simple until you’re staring at dozens of options and realise you don’t know what half the product descriptions actually mean. Canvas size, drill shape, colour count – it all adds up fast. Choosing badly means you’ll either blast through the project in an hour and feel short-changed, or you’ll quit halfway because the detail level is crushing. Here’s the thing: a few clear criteria cut through all of that. You don’t need experience to spot a well-made kit; you just need to know what matters before you add anything to your basket. This guide walks through canvas size, drill type, kit quality, and design detail – so you can choose a first diamond painting project you’ll actually finish. Get the choice right, and the hobby tends to stick.
Understanding What Goes Into a Diamond Painting Kit
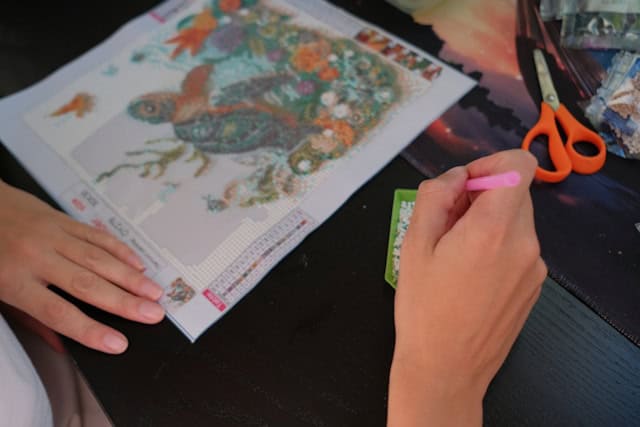
A good starting point is knowing what the kit actually contains, because not every product on the market packs in the same components. Diamond painting kits for beginners typically include a pre-printed adhesive canvas, a set of resin drills sorted by colour, a drill pen, wax or gel to help the pen pick up drills, and a tray for organising colours as you work. Some kits throw in a light pad too, which is genuinely useful if you plan to work in dim conditions. Beginner-specific kits aren’t just smaller, they’re put together so someone with zero experience can open the box and start without confusion. A kit that omits the tray, the wax, or the pen forces you to source those items separately, which is an annoying extra cost you didn’t budget for. Before you buy, check the product listing and confirm every tool is included. That’s why diamond painting kits for beginners tend to feature larger drills that are easier to grip and canvases with clearer colour codes to reduce frustration as you develop your technique.
Canvas Size and How It Affects Your First Project
Canvas size is the single most important call a first-time buyer makes, and most beginners badly underestimate how long a larger canvas actually takes. Something in the 20 cm by 20 cm to 30 cm by 30 cm range is the standard recommendation for someone just starting out. It’s large enough to feel satisfying when it’s done – you can frame it, gift it, display it – but small enough that you’ll finish within a few evenings rather than leaving it rolled up on the table for months. Larger canvases in the 40 cm by 60 cm range look impressive in listings. But they demand a serious time commitment and a lot of patience with fiddly colour swaps. The pull toward going big is real, especially when you spot a gorgeous nature or portrait design, yet a smaller first project gives you space to practise the technique, understand the rhythm of placing drills, and build real confidence before taking on something ambitious. Start smaller than you think you need to.
Drill Type: Round vs Square Diamonds
The shape of the resin drills has a noticeable effect on both the difficulty of the project and the finished look. Round drills are easier to pick up, easier to place, and far more forgiving when you drop them or nudge them slightly off position; they leave small gaps between each drill on the canvas, giving the finished piece a softer, mosaic-like quality. Square drills sit edge to edge, no gaps, sharper detail, more striking final image. They look exceptional once finished, but they require more precision. A misplaced drill in a row of squares is far more visible than one in a row of rounds, and you’ll spend real time correcting alignment. For a first project, round drills are the practical choice. You’ll spend less time fixing mistakes and more time enjoying the process. Square drills are worth exploring once you’ve completed two or three projects and feel genuinely comfortable with the rhythm.
How to Read Kit Quality Before You Buy
Kit quality varies more than most beginners expect, and a cheaper kit often creates more headaches than it saves in cost. The two main quality indicators are the canvas material and the accuracy of the colour-coded drill system. A poor-quality canvas loses its adhesive quickly, especially if you work on a section across several sessions. Poor colour coding – where drill colours are hard to tell apart or the canvas symbols are blurry – slows everything down and leads to errors that are difficult to fix. You don’t need to spend a fortune, but you do need to read product reviews and check whether the kit comes from a supplier with a clear quality standard. In the UK, reputable diamond painting retailers tend to produce more consistent results than generic marketplace sellers importing kits without checking production standards. Spending a little more upfront almost always delivers a better experience and a finished project you’re actually proud of.
What the Canvas Material Tells You
The adhesive canvas is the foundation of the whole project. High-quality canvases use a double-layer adhesive that stays tacky across multiple work sessions, even if you fold back the protective film and re-cover the canvas repeatedly. A single-layer adhesive starts losing its grip after the first few sessions, which means drills shift or fall off before you seal the finished piece. The canvas fabric itself should have a slight stretch but lie flat on a table without curling. If a canvas arrives creased or warped, you can usually flatten it under heavy books for 24 hours, but a persistently warped canvas creates alignment problems throughout the whole build. And the printed symbols should be sharp enough to read comfortably under normal household lighting. If you’re squinting, the print quality is substandard, and that frustration compounds every single session.
Colour Coding and Drill Count
The colour system on a diamond painting canvas works like a map, and the clarity of that map directly affects how long each session takes. Each printed symbol corresponds to a specific drill colour, and the guide – usually printed along the canvas edge or provided as a separate sheet – tells you which symbol matches which bag. A well-designed kit uses symbols that stay visually distinct even at small sizes: triangles, circles, squares, crosses, shapes that don’t blur together. Poor kits sometimes rely on symbols that look nearly identical when printed small; the trick is checking sample images in the product listing before you commit. Drill count refers to the total number of distinct colours in a kit. Projects with fewer than 20 colours tend to be simpler and faster; projects with 40 or more are detailed and time-consuming. For a first kit, staying in the 15 to 30 colour range keeps the project manageable without making the finished image look flat.
Conclusion
Choosing the right diamond painting kit as a beginner comes down to four decisions: canvas size, drill shape, canvas quality, and colour detail. A smaller canvas with round drills, a strong adhesive surface, and a sensible colour count gives you the best possible first experience. You’re not locked into that format, most people find that after one or two completed projects they’re confident enough to push into larger canvases and square drills. The activity itself is genuinely relaxing once you’re past the learning curve, and a good first kit is what makes that curve feel short rather than steep. So take a few minutes to read reviews, check what’s actually in the box, and think honestly about the time you have available. The right kit isn’t the most impressive one in the catalogue; it’s the one that matches where you are right now and leaves you wanting to start the next one.